For those of you that have checked the Resources page on TPC you already know this guest blogger. Hester Blok is a collegue of mine at JSR in The Netherlands, and also has a small blog on a niche subject in a niche market: Workflows for project server 2013. She has decided to stop blogging and wanted to preserve a few gems she created by adding them to The Project Corner. Without further ado, here’s Hester with “Workflows for Project Server 2013”.
The guest post
Workflows are – in my opinion – essential to effective project portfolio management. In Project Server 2010 we had to rely on developers to create workflows in Visual Studio or on third party products such as UMT’s Project Essentials. In 2013 we can create workflows using the SharePoint Designer 2013, without writing code or purchasing additional licenses. This applies to on prem Project Server 2013 as well as to Project Online. In this blog I describe the challenges we met and their solutions using these new capabilities.
SharePoint Configuration
First of all you need to make sure that the Workflow Manager has been deployed to your SharePoint 2013 farm. The easiest way to check is to:
1.open the SharePoint Designer 2013,
2.connect to a PWA site,
3.select Workflows in the Navigation menu,
4.click New Site Workflow in the ribbon.
You should be able to choose from three platform types:
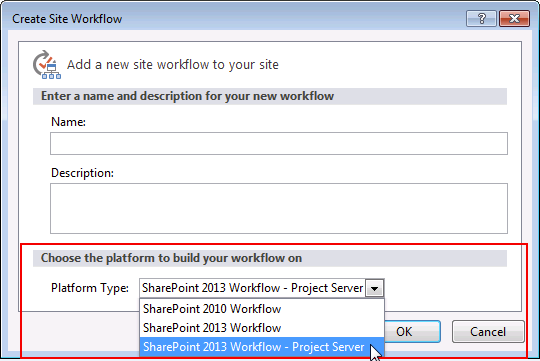
If you cannot choose the third platform type shown in the image above, here is how the Workflow Manager should be installed and configured: http://technet.microsoft.com/en-us/library/jj658588(v=office.15).
Design
There is a set of shapes in Visio 2013 that allows you to draw your workflow in a file format that can be imported into SharePoint Designer 2013. This can be helpful to determine your organization’s needs. Additionally, it is important to create an overview of the custom fields and pdp’s used per stage and to maintain this overview as you make changes to the workflow.
Create
Once the design is clear you start by creating the custom fields, pdp’s, phases and stages in Project Server. After you have created all building blocks in Project Server and (optionally) the process drawing in Visio you are ready to actually create the workflow in the SharePoint Designer. You’ll find detailed instructions on http://msdn.microsoft.com/en-us/library/office/jj163494(v=office.15). In addition to these instructions here’s some practical tips.
Optimizer Commit value
“Optimizer Decision” in the SharePoint Designer corresponds to the “Committed Portfolio Selection Decision” field in Project Server. The values for the Optimizer Decision field are:
0 = Forced In
1 = Forced Out
2 = Unselected projects
3 = Selected projects
In SharePoint Designer the workflow stage will look something like this:

After there is a Commit on a Portfolio scenario Project Center looks like this:

Loose ends
A workflow – in any application – shouldn’t contain loose ends. There is no need for an action in every stage, but in the “Transition to stage” section there should always be a “Go to”. At least fill in “End of Workflow”.
Submit button grayed out
In our on prem Project Server 2013 we encountered a grayed out Submit button in the first stage of the workflow, where we configured the workflow to wait for the project to be submitted. We tried changing the configuration of the Workflow Manager, even reinstalling it, but that didn’t help. We found a simple work around and although it is kind of silly and far from ideal I would like to mention it here, because I couldn’t find any information on the internet. The work around is to restart the workflow via Server Settings > Change or Restart Workflows:

An 2016 update from Hester
Two things I learned recently about workflows for Project Server:
- In order for the Skip to stage function to work, you need to insert the “Include this stage” condition in every stage you want to be able to skip to. In many cases you will have the workflow wait for a user to click Submit before Transitioning to the next stage. The Submit action needs to be under the “Include this stage” condition, like this:

- If you are importing projects from another system, or from an Excel list, and the projects are in PWA governed by a Project Server workflow, the imported data must contain values for all conditions that the workflow evaluates, because all workflow logic will be applied when you skip stages using the Change or Restart Workflows function.
Final notes on Workflows for project server 2013
Hi there, here’s Erik again. Hope you enjoyed this first part of a 3 part series on workflows in Microsoft Project Server 2013. Hester created some more great content that she is willing to share on The Project Corner, so keep an eye out for the next article. Also, there is a big reveal at the end of the last post! To be continued.
Paul Mather (who we know from the resources page of course) recently started his own series on Workflows, very extensive and a nice example of workflow creation just like Hester’s posts.
If you can’t get enough of “workflowy goodness”, have a look at his first post here. PS: Paul, if you are reading this post; I’d love to explore options to feature you in a guest post, enjoy your blog greatly!
If you liked this post, you might like the other guest posts as well. I made a summary at the end of the last one, with all the useful links: What is a WBS?
4 thoughts on “Workflows for project server 2013 – Guest post”
Comments are closed.